Thursday, August 30, 2012

Baby Bibs


 Look at these cute baby bibs! 


I purchased the cross-stitching bibs from Jo-Ann Fabrics, but added scrap fabric to them instead.   


Elephants, hippos, monkeys, strawberries...oh my!

Tuesday, August 28, 2012

Perfect Pumpkin Muffins - And Vegan Too

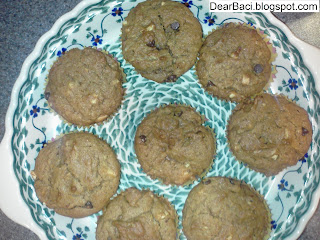
These pumpkin muffins are scrumptious.  They're moist, light, and vegan too. 

The original recipe (which I changed a bit) is for pumpkin bread.  The bread makes a mess in our house and we don't always eat it.  The MUFFINS on the other hand go quickly.  Just unwrap the paper lining and pop them in your mouth for a quick little snack. 


 Makes 12 Perfect Pumpkin Muffins:

1/2 cup chopped walnuts, peanuts, or whatever nuts you have on hand
1-3/4 cups all-purpose flour 
1 cup packed dark brown sugar
1/3 cup white sugar
1 teaspoon baking soda
1/2 teaspoon salt
1/2 teaspoon all-spice 
1/2 teaspoon ground nutmeg
3/4 teaspoon ground cinnamon
1 cup pumpkin puree
1/3 cup vegetable oil
1/3 cup coconut milk
1/3 cup flaked coconut
1/3 cup mini chocolate chips

Directions:
1. Preheat oven to 350°F and place 12 paper liners in your muffin tins. 
  
2. If using walnuts, toast them for 8 to 10 minutes, or until lightly toasted, on an ungreased baking sheet.  Place aside to cool. 

3. In a large bowl, stir together the flour, brown sugar, white sugar, baking soda, salt, nutmeg, all spice, and cinnamon. Add the pumpkin puree, oil, and coconut milk.  Mix all the ingredients. Gently fold in the flaked coconut, mini chocolate chips, and toasted walnuts. 

4. Place the batter into the 12 paper liners. 

5. Bake for about 25 minutes.  Let cool and enjoy!

Cooking Notes:

I have made this recipe several times.  Yesterday I did not have any walnuts, so I used some peanut pieces and it worked.  I didn't toast the peanuts because they were already roasted (so I skipped Step #2). You can even see the peanuts in the above photo.

Also I reduced the amount of oil from the original recipe because they were too greasy; in fact, you could see the excess oil on the liners and in the muffin tins. 

Sunday, August 26, 2012

Nine Little Elephants: A Baby Quilt

Nine Little Elephants 

My newest baby quilt creation -  nine little elephants from nine different fabrics. I used the same nine fabrics for the ear and border. I saw a pattern here, but created my own. This finished quilt is about 45"x48".


Using Wonder-Under and a high iron, I attached each pachyderm onto a 7"x8" white rectangle.  Then I top-stitched each one with a zig-zag stitch, and added the border (again the border and ear are the same material).  The finished squares were 12" each.  Next I joined each square and row with a white border (the same fabric the elephants were mounted on).


I sent the quilt top to Bayberry Quilts for the finishing touches. They quilted and bound it with the blue fabric I used for the upper right elephant and the border in the opposite corner.

Finally I included a handmade elephant card and gave this quilt for a baby shower gift.  

Wednesday, August 22, 2012

Elephant Note Card


This little guy accompanied my baby shower gift - the nine little elephants quilt.  Isn't he so cute?

For the elephant note card you'll need:
card stock or blank note card
googly eye
2 complimentary scrapbook papers
photo mounting squares or glue stick

Draw or trace an elephant on one color scrapbook paper.  I used this one for inspiration.  Then draw an ear and tail on another paper.  Cut out the pieces. Attach the elephant onto your note card with photo mounting squares or glue stick.  (I purchased my Craft Smart Photo Mounting Squares from Michaels, but I cannot find them on the Internet to attach a link. Sorry.)  Add the googly eye and your elephant card is complete!

Saturday, August 18, 2012

Kielbasa Two Ways

Kielbasa Two Ways:
 Grilled and BBQ Kielbasa with Lazy Pierogi
First of all, a special thanks to our families for mailing us not one, but two kielbasas.  We decided to cook our kielbasas two different ways.

First, we boiled each kielbasa in a shallow frying pan for about 10 minutes/side.  Then we grilled one kielbasa on the gas grill. Notice the subtle grill marks on the upper kielbasa. The other we broiled in barbeque sauce.  Yes, we made bbq kielbasa - maybe not the most traditional Polish dish, but I have been making it for years.

During college I worked with a Polish woman named Amy, who made sweet and sour kielbasa in a crock pot for a pot lock dinner.  For many years I too cooked sweet and sour kielbasa with World Harbors Maui Mountain Hawaiian Style sweet n' sour sauce, but I couldn't always find it at the grocery store.  By this time my family was hooked on this appetizer so...I improvised.  I began using barbeque sauce and it worked!  In fact, any bbq sauce is delicious for bbq kielbasa.

For bbq kielbasa:
1. Boil your kielbasa for 10 minutes/side in a shallow frying pan.
2. Let cool then slice.
3. Place the slices into an oven-safe baking dish and cover with your favorite bbq sace (1 jar/ kielbasa).
4. Bake for about an hour at 350°F stirring halfway through.  During the last few minutes I broil the kielbasa to crisp and char the edges.

Give this contemporary Polish dish a try.  This is my go-to appetizer for family functions because everyone LOVES it.  I usually make 2-3 kielbasas and it all gets eaten.

Smacznego!

Lazy Pierogi

Lazy Pierogi with
Kielbasa Two Ways: Grilled and BBQ Kielbasa

In the middle of the kielbasa cooked two ways  is a buttery dish, we call lazy pierogi.  I have attempted to make pierogis with my Mother, sister, and sister-in-law, but it is a tremendous amount of work and I cannot make dough.  Therefore, I don't even attempt to make pierogis with M.  We opt for lazy pierogi because, well, as the name implies easier than the traditional Polish dumplings.  This is not the healthiest dish, but it reminds us of home. And every once in awhile, we like to be reminded of our mothers' and Bacis' cooking. 

Lazy Pierogi Ingredients:
lots and lots of butter (at least 4 tablespoons)
2-3 large onions, chopped in small pieces
1 bag of egg noodles
salt and pepper to taste

1. In a sauce pan, sauté the chopped onions in butter until transparent. 
2. In a separate pot, boil the egg noodles as directed on the package.
3. Add the cooked noodles to the onions, add more butter, salt and pepper.

The more butter the better.  Again this is not the most nutritious recipe, but the more butter the more authentic this Polish dish will be.  Smacznego!

Monday, August 13, 2012

Pesto Rounds


Pesto Rounds are one of M's awesome appetizers.  They're quick and easy to assemble and your guests will eat them up at your next dinner party.  Not to mention they're petty looking, too bad I didn't photograph them on a nicer serving platter. 

You'll Need:
French baguette, thinly sliced
pesto
sliced tomatoes (one tomato/baguette slice)
Shaved Parmesan, Romano, and Asiago cheese (comes in a container from Trader Joe's)
salt and pepper 

Directions:
1. Toast the baguette in the oven for a few minutes at 350°F.
2. Spread pesto onto each toasted baguette.
3. Top with tomato, cheese, and salt and pepper.
4. Bake in the oven for a few more minutes until the cheese is slightly melted.  

Sunday, August 12, 2012

Roasted GAAAr-lic

This summer we have been treating ourselves to roasted garlic, fresh French bread, cheese, berries, olives, and of course wine.


Roasted Garlic Ingredients:
1 head of garlic
good extra virgin olive oil (EVOO)
French bread
berries, cheeses, olives (optional)

In traditional Italian restaurants you receive a whole roasted garlic, but that takes too long to cook (about an hour).  For quicker roasted garlic, I simply remove as much of the outer papery skin as possible and separate the garlic into individual cloves with the skins in place.  Put the cloves into an oven-safe ramekin and cover with EVOO.  Bake for about 30 minutes at 350°F.   Remember to remove the garlic skin before eating.   We simply squeeze the garlic onto the bread - the garlic and oil just ooze out.

Enjoy with soft French bread!  You could even combine with fruits, olives, or nuts of your choice. 

Monday, August 6, 2012

All You Need is LOVE

I saw this mini-LOVE quilt on Pinterest and thought I've give it a try.  It's a paper piecing quilt, but I should have researched the subject a bit more before cutting the pattern apart.  Apparently for paper piecing you keep the pattern whole and literally sew ON the paper with the fabric underneath.  For a better explanation check out this Paper Piecing Made Easy Tutorial.   

So here's my LOVE quilt; it's not paper pieced, or exactly like the pattern, but LOVE is unique. 


We are all a little weird and 
Life's a little weird,
And when we find someone whose 
Weirdness is compatible with ours,
We join up with them and fall in
Mutual weirdness and call it Love.

- - Dr. Seuss 

Thursday, August 2, 2012

Super Successful Fruit Fly Trap


Fruit flies have been rampant in our house lately.  They are in the kitchen, living room, and even hovering over the mirror in the bathroom.  I don't know what it is, but yesterday we had ENOUGH.  My boyfriend found a few online recipes: sugar water in a bottle with a paper funnel (not successful), and 1 cup apple cider vinegar with a few drops of dish soap (SUPER SUCCESSFUL).  Can you see all the fruit flies we caught so far?

We made two traps and have already caught over eleven little buggers. I feel bad that we are harming them.  We save spiders in this house.  Honest.  However, my BF reminded me that I am not killing them, they are just nosy and checking out the sweet-smelling liquid.

NOTE: Apple cider vinegar is a pungent scent and our house is really pungent with these fruit fly traps scattered around our humble abode.