Tuesday, July 31, 2012

Jigsaw Puzzle Quilts


I saw a puzzle quilt on Pinterest this morning which reminded me of two jigsaw puzzle quilts I made a few years ago. One was for my nephew (above) and the other one I created for my friend's daughter (below). 

The Jigsaw #201 pattern designed by Alyssa Clancy for Lehmann Quilting is for a full-size quilt.  However, I used half the pattern (24 blocks) for each crib-size quilt.  


My friend's daughter is 2 1/2 and she is now using this quilt in her big girl bed.  Yay! I'm psyched that my quilts are being utilized.

Monday, July 30, 2012

Campfire Cones

These campfire cones were an awesome addition to our camping trip.  My friends and I still made the traditional S'Mores, but also assembled and ate campfire cones when it was time for our second dessert.  The recipe calls for sugar cones, mini-chocolate chips, peanut butter, bananas, and mini-marshmallows.  We made these for two different camping trips - with and without the marshmallows.

I was disappointed that the marshmallows did not melt as well as the other ingredients. Next time we make campfire cones, we'll either omit the marshmallows, or toast them first (like for S'Mores).


Look how the warm peanut butter and chocolate just ooze out. What's not to love about melted peanut butter, chocolate, and bananas in a crunchy cone!

Friday, July 27, 2012

Fire-breathing Toilet Paper Roll Dragons

Here's an easy and fun dragon craft you could make with your kiddos or students after reading a dragon story, like:

Raising Dragons by Jeredine Nolen
How to be Friends with a Dragon by Valeri Gorbachev
Goodnight, Dragons by Judith Roth
Good Night, Good Knight by Shelley Moore Thomas
If I Had a Dragon by Tom and Amanda Ellery

I was inspired by the dragons I saw here.

For Fire-breathing Toilet Paper Roll Dragons You'll Need:

-toilet paper rolls
-green paint
-pom poms (4/dragon)
-self-adhesive googly eyes
-red and yellow crepe paper (cut into 6" pieces)
-Elmer's glue 


1. Paint the toilet paper roll green.  Let dry.
2. Glue 3-4 pieces of crepe paper inside the toilet paper roll.
3. Glue 2 pompoms on the top of the roll - above the crepe paper - to make the snout.
4. Attach the googly eyes to 2 more pompoms.
5. Glue the pompom eyes to the top back-end of the head. 


I tried making a fire-breathing dragon with a paper towel roll, but the snout looked too long, and the pompoms and eyes seemed out of proportion.  Perhaps the paper towel dragon would have been more successful if I used larger pompoms and eyes.

Thursday, July 26, 2012

Chicken Tikka Masala

The other night I was craving chicken on the grill.  My boyfriend suggested we make chicken tikka masala.  I wanted a recipe that was easy to make and one that did not require too many ingredients that we would never use again if the dish was a flop (which is was not - please keep reading).   So we bought a new propane tank for the gas grill and a few ingredients for our Indian meal.

Chicken Tikka Masala with Sautéed Greens (upper left)

I found a great recipe here, which we tweaked. This recipes serves 4, which we ate for dinner and still had enough a left-over lunch the next day.

Marinade:
1/2 cup yogurt
1-1/2 teaspoons lemon juice 
1 teaspoon ground cumin
1/2 teaspoon ground cinnamon
1 teaspoon paprika
1 teaspoon freshly ground black pepper
1-1/2 teaspoons minced fresh ginger
2 teaspoons salt, or to taste
3 thin boneless skinless chicken breasts, cut into bite-size pieces (less than a pound of meat)

Grill: We added the marinated chicken and 1/2 onion - chopped in large pieces - onto 4 wooden skewers.

Tikka Masala Sauce:
1-1/2 teaspoons butter
1/2 clove garlic, minced
1 jalapeno pepper, finely chopped
1 teaspoon ground cumin
1 teaspoon paprika
1-1/2 teaspoons salt, or to taste
8 ounce can tomato sauce
1 cup heavy cream
1 can of peas
small can of tomato paste

Garnish: chopped fresh cilantro

Procedure: 

1. In a large bowl, combine yogurt, lemon juice, 1 teaspoon cumin, cinnamon, paprika, black pepper, ginger, and 2 teaspoons salt. Stir in chicken pieces, cover, and refrigerate for at least 45 minutes. 

2. Preheat grill on high heat. 

3. Lightly oil the grill grate. Thread chicken and chopped onion onto skewers, and discard marinade. Grill about 5 minutes on each side. 

5. Melt butter in a large heavy skillet over medium heat. Sauté garlic and jalapeno for a few minutes. Season with 1 teaspoon cumin, paprika, and 1-1/2 teaspoons salt. Stir in tomato sauce, cream, and tomato paste. Simmer on low heat until sauce thickens, about 15-20 minutes. 

6. Add the grilled onion to the sauce and blend with an immersion blender.   

7. Fold in the grilled chicken and peas into the tikka masala sauce. 

8. Place chicken tikka masala over jasmine rice and  garnish with fresh cilantro.

COOKING NOTES: The peas added a great textural element to the sauce.  We're thinking of incorporating potatoes and/or cauliflower next time as well. 

I cannot express how delicious this Indian dish was.  My boyfriend stated that it was even more impressive than some of the chicken tikka masala meals we had in actual Indian restaurants.  If you enjoy Indian food, than you must try this recipe!!!  We've been talking to all our friends about it and will definitely be making it again.

Wednesday, July 25, 2012

Sautéed Greens

This time of year, there are so many delicious greens at the farmers market.  I selected Chinese broccoli (which we never tried before), dandelion greens, and some red chard. The greens were a wonderful side to our chicken tikka masala (recipe coming soon). 

Sautéed Greens (upper left) and Chicken Tikka Masala

Sautéed Greens
Serves: 4

Ingredients:
8 cloves of minced garlic
Chicken broth
Bunches of greens (Chinese broccoli, dandelion greens, red chard, or whatever you like that's in season)
Salt and pepper to taste

Directions:
1. Mince the garlic and add it with some olive oil to a hot skillet.
2. Separate the leaves from the stalks of the red chard.  Cut the stalks into bite-size pieces and place in the pan with some salt and pepper. 
3. Sauté for several minutes until the stalks soften.  For more flavor, I used chicken broth, but you could always add water or vegetable broth. 
 4. Next chop the greens and add them to the pan.  Again I added more chicken broth, salt, and pepper. Stir often, until the broth evaporates.
5. Cook until the greens are tender. 

COOKING NOTES: I used the entire bunch of chard and a half bunch of broccoli and dandelions. 

I had an opened 14oz can of chicken broth in the fridge.  I used about 3/4 cup to 1 cup of broth.

You can see the red chard stalks in this picture.  The yellow, orange, and red stalks from rainbow chard would be a colorful addition to this dish.

Monday, July 23, 2012

Very Hungry Caterpillar Quilt in Blue

The Eric Carle fabrics have inspired me to create another crib-size quilt.   This quilt also sparked my creativity.  Thanks, Mom, for finding it!


All the fabric (with the exception of the blue, yellow, and green pieces) is from the Eric Carle Very Hungry Caterpillar fabric line.  I began in the center with the caterpillar from the draft stopper panel.   Then I added a 2" border of the color dots, followed by the 3" squares: yellow, green, fruit, and junk food.  Next I stitched a blue border around this center piece and another blue border around the food on the sides; and I joined them all together.  Finally, I sewed a strip of 8" squares - color dots, green fabric, and green caterpillars with texts - to finish the top and bottom.  This completed the top.  Again I brought this baby quilt to Bayberry Quilts to be professionally quilted and bound. I used the same blue fabric for the binding and also the back. 

NOTE: In order to stretch all the Eric Carle fabric I had, I interspersed the fruit and junk food squares with the yellow and green fabric and along the sides with the blue border.

Tuesday, July 17, 2012

Kite Runner Curtains

I have yet to read The Kite Runner by Khaled Hosseini, but I am calling these curtains my kite runner curtains.  It's not because they have anything to do with the Aghan novel, but because the fabric reminds me of the cover.  Look behind the title.  It's as if the curtains are blowing in the wind with the kite.

A few weeks ago, I finished the Anthropolgie-inspired curtains for my friend's guest bedroom.  The windows in her bungalow are a unique size, which makes it difficult to find curtains that fit; therefore, she asked me to customize the curtains for her home. Well, these kite runner curtains - made with a brown, orange, and green batik fabric - are for her living room.

Sunday, July 15, 2012

Yellow Block-of-the-Month Quilt


A few years ago now, more like six or seven, I took two block-of-the-month quilting classes with Linda Warren at Valley Fabrics: a batik and contemporary block-of-the-month.  Each month Linda would show you how to make one of the blocks.  Then you'd complete your block at home and come back to class the next month with your finished square and she'd teach you how to make the next one.  My mom, sister, and I did this for a whole year.  By the end of the year, I had twelve squares/quilt, which I turned into a fantastic king-size batik quilt and a gorgeous contemporary quilt.  Both quilts were wedding presents for my friends.


While were were taking the class, Linda suggested that we practice each month's technique/pattern on our own fabric, before attempting the new skill with the fabrics for class.  As you may have noticed, I am always giving my quilts away, but this time, I decided to turn the practice pieces and into a quilt for myself. 


I completed the quilt top years ago and had it quilted years ago by Elaine Huffman, but finally finished and bound it.  

This yellow block-of-the-month quilt is warm, cheery, and makes me smile. It's fitting that I finished it in sunny San Diego. 

Monday, July 9, 2012

Olympic Ring Contemporary Art

With the upcoming Summer Olympic Games, why not use make an Olympic ring contemporary art project with your children or students in summer school?  That's exactly what we did today with some empty toilet paper rolls and paint.  I saw the idea here, and thought it would be a wonderful connection to the festivities that will happen in London later this month. 

For this project you'll need:
Five colors of paint (red, green, blue, yellow, and black)
At least one empty toilet paper roll/color
Paper plates/bowls for the paint
White tag board (or other heavy paper)

Set up the paint and let the kids create!

NOTE - We attempted using paper towel holders; however, they were too long and kept toppling over into the other paint colors - making a mess.  If I were to do this again, I would only use toilet paper rolls or cut the towel paper ones in half.  

This was an enjoyable project for 8-10 year olds and for me as well.

Wednesday, July 4, 2012

French Onion Soup


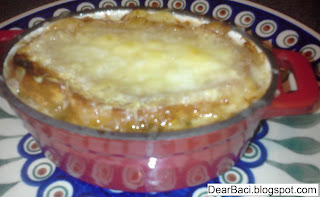
French Onion Soup in mini cast iron casserole dishes from Martha Stewart.


Happy 4th of July!  While the rest of the country is experiencing a heat wave, it's cool and cloudy here; I think it even rained this morning.  Today's the perfect day for us to eat warm, yummy French onion soup.  That's exactly what my boyfriend made for lunch. Sorry America, no cookout here. 

Servings: 6 bowls


You'll Need:
4 medium to large, white or yellow onions
1/2 stick of butter (salted or unsalted)
2 shots of bourbon, Irish whiskey, or brandy (to taste)
2 fourteen ounce cans of beef broth
1 fourteen ounce can of chicken broth
6 ounces fresh Gruyere cheese
1/4 cup of white wine
salt and pepper to taste
baguette 

Method:
1. Quarter each onion and cut into small slices.  Save half of the onions for later. 
2. In a stock pot, sauté half of the onions in butter, until translucent. 
3. Add 1 can of beef broth and bring to boil.  
4. Next add the raw onions, remaining broth, 1/4 cup white wine, and salt and pepper to taste (a healthy pinch).
5. Cook on medium for 30-45 minutes, or until the raw onions are soft and translucent.  Then add the whiskey/bourbon/or brandy when nearly done. 
6. Taste and adjust seasoning if necessary. 
7. When the soup is ready, slice a baguette into 3/4" slices and toast the baguette by itself so it will hold up to the broth.
8. Put the toasted baguette in a cast iron dish (or bowl that is SAFE to place in the oven).  Ladle the French onion soup over the baguette and top with shredded cheese.  Place under the broiler until the cheese is melted.  Enjoy!

Cooking Notes:
We used a 2 to 1 ratio of broth - 2 cans of beef to 1 can of chicken.  However, you could always make this a vegetarian recipe and use all vegetable broth. 

Use whatever onions you like, with the exception of red onions. 


We ate our delicious French onion soup with a Ruben and pickle.